
HHTTPPP; Setting up the HTTP protocol
python scorch web theory
Crossposted from https://schulichignite.com/blog/hhttpp/setting-up-http-protocol/
Table of contents
- Terms & Concepts
- Anatomy of a URL
- How HTTP Works
- Request <—> response
- Anatomy of a request/response
- Headers
- MIME Types
- Request
- Methods
- Responses
- Status codes
- Let’s look at existing sites
- Browser dev-tools
- httpie
- Curl
- How we’re going to implement all this
- Testing
- Our TDD Approach
- HHTTPP Structure
- Additional features
- More resources
HTTP is the protocol that runs the web, it’s the way most devices talk to each other these days. It’s also the protocol we are going to use, and as such we need to get everything setup for the http protocol. For this series we are taking an object-oriented aproach, so we will want to create the Server, Request and Response objects to house our info. This will help us model out the HTTP protocol, so we can do everything else we need to later.
Terms & Concepts
These two next sections are a repeat of the terms section in the series introduction, you can skip them by clicking here
To start there are some terms we need to understand. Here are some of the basics:
| Term | Description | Example |
|---|---|---|
| IP Address | This is what computers use to communicate with one another, it is similar to an actual address | 127.0.0.1 is the IP address reserved for the computer you’re currently on, so if you need to communicate with yourself you can (this is useful for testing) |
| Port | A computer can have multiple servers running on it. Each of these “servers” runs on a different port so you can communicate with them sparately | If you are running a server on your own machine and have it on port 8080 you can access it in a browser at http://localhost:8080 |
| Proxy/alias | In our context we’re using this to mean something that stands-in or is replaced by something else | For localhost is a proxy for 127.0.0.1 on your computer, so if you go to localhost it is the same as going to 127.0.0.1 |
| Host | The name of a computer (local/on the machine) | Let’s say you gave your PC the name thoth when you set it up, then on your own network you can access it at thoth or thoth.local (an alias for an IP) |
Anatomy of a URL
Some of the most important terms we need to understand are what makes up a URL. A URL is what we type into a browser bar to get to a site (i.e. https://schulichignite.com). Here is a diagram breaking apart the different peices:
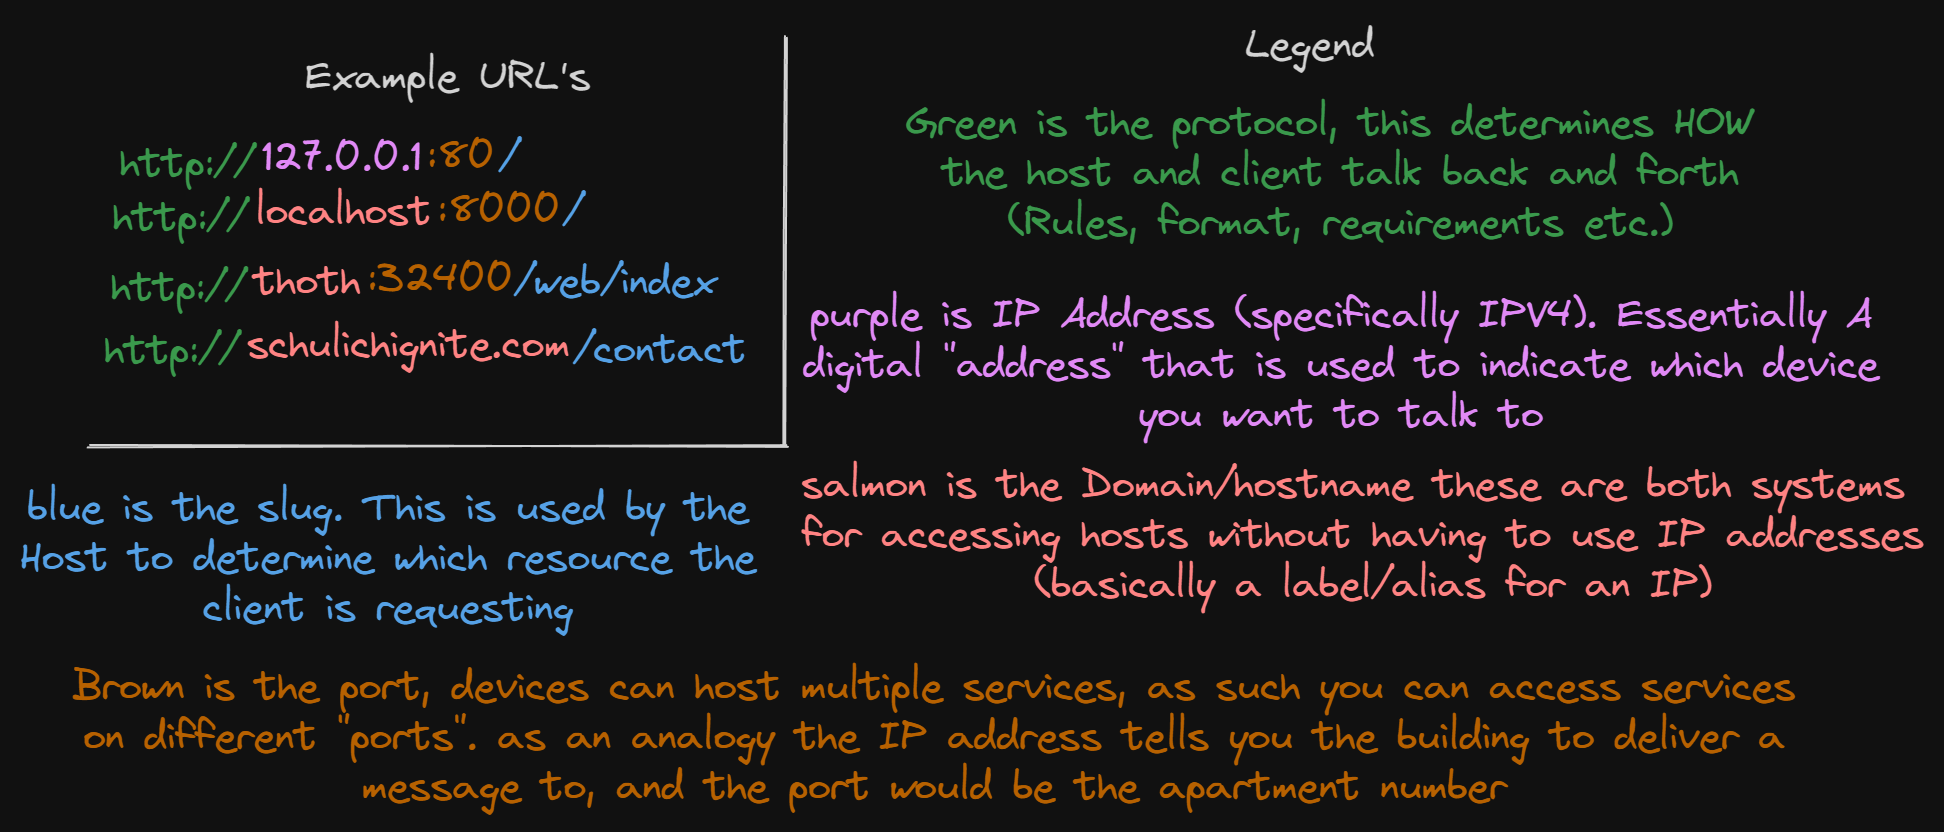
For those of you that can’t read the image, this is the basic anatomy of a URL:
<protocol>://<domain/hostname/ip>:<port(optional)><slug/URI>For example here are some URL’s:
http://127.0.0.1:80/
http://localhost:8000/
http://thoth:32400/web/index
http://schulichignite.com/contact
http://example-site.co.uk/about-us| Term | Description | Example |
|---|---|---|
| Protocol | The protocol is the rules and procedures that the browser should follow to communicate with the underlying server | http://, https://, file:// |
| Domain | The name of a computer (remote/on a server accessible to the internet) | When you go to google.ca that is a domain, the domain itself is an alias for the IP address of a server that returns the webpage you’re looking for domains have 2 parts, the domain name, and the TLD |
| Domain Name | The domain name is the main portion of the domain, before the . | google, netflix, schulichignite |
| TLD (top-level domain) | These groupings of domains used to serve more of a roll before, but now are mostly all the same. They are the letters that come after a . in a URL, and indicate usually which country the service is from | .ca,.com,.co.uk,.sh |
| Slug/URI | The part that comes after a domain to indicate which specific resource you want from the specified server on the specified port | /, /about,/blog/title |
How HTTP Works
Let’s look at the theory of how HTTP works, and the steps made in the protocol.
Request <—> response
HTTP is a request to response protocol. This means the client will create a request that is sent to the host server which is then processed and a response is sent. You can think of this like mailing a letter to where you add in the contact details, send a letter and recieve a response:
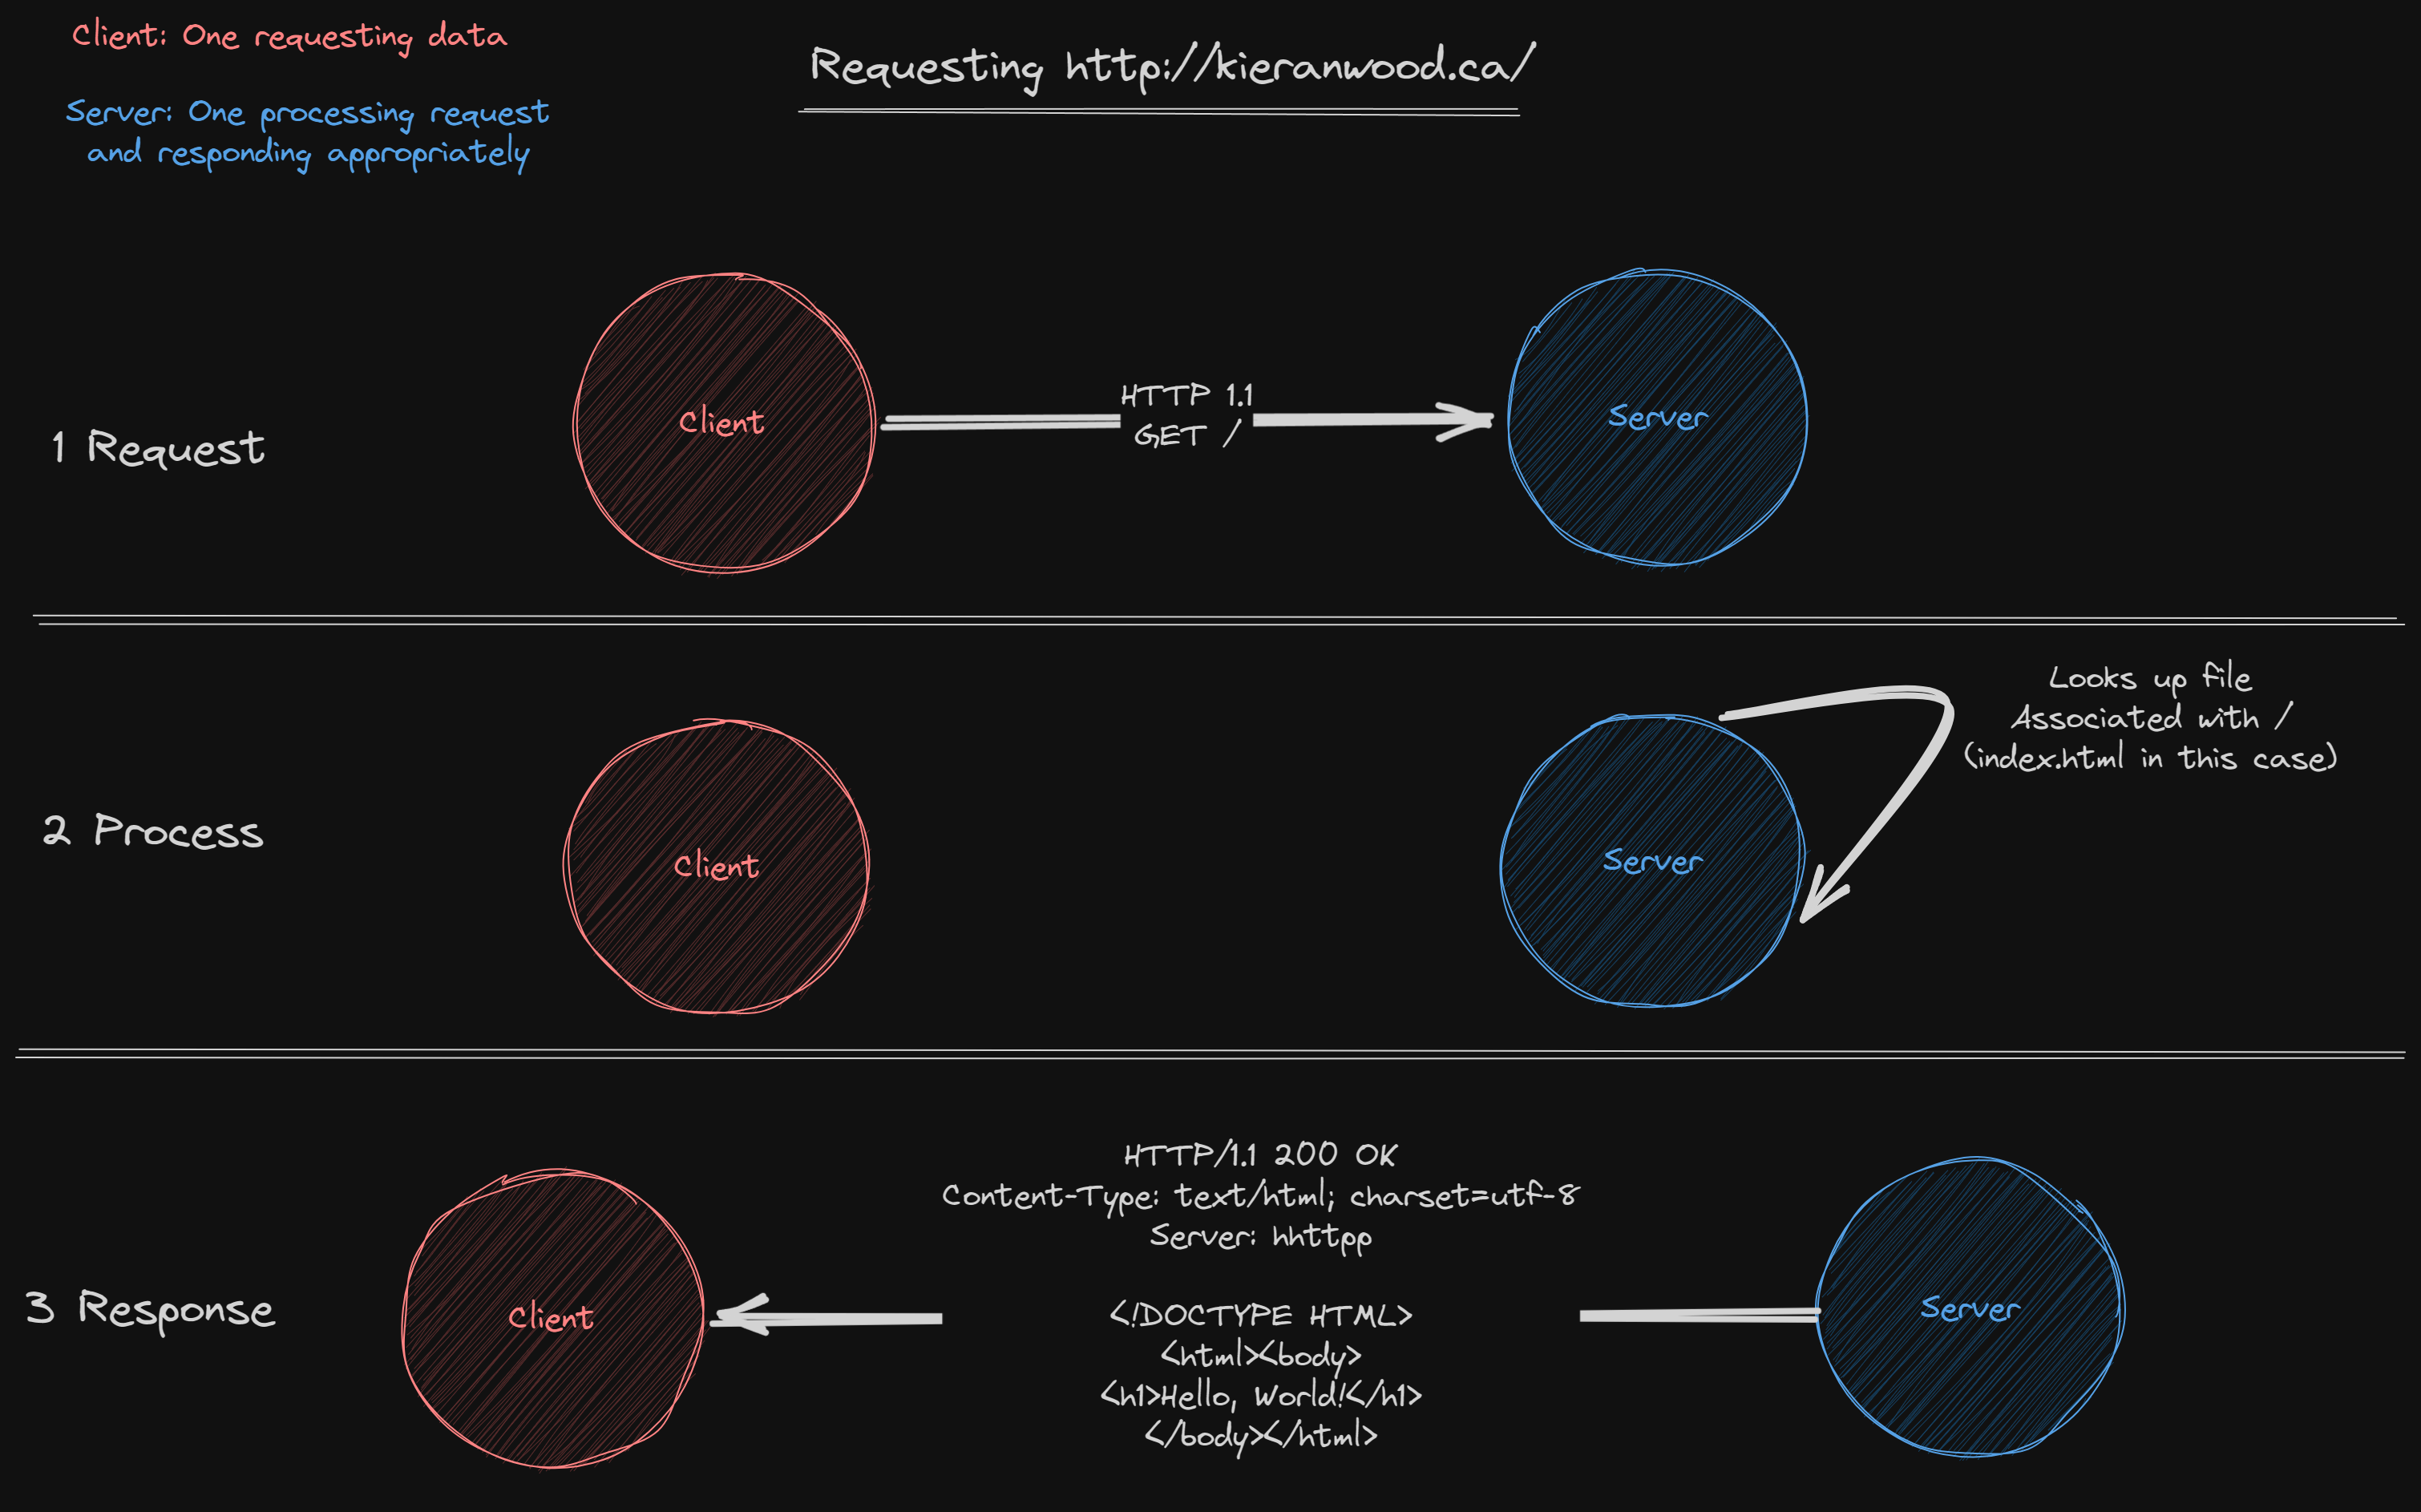
Requests must have:
- A method
- A hostname
- A slug
- Content (optional)
Responses must have:
- A status code
- Content (optional)
Anatomy of a request/response
All requests/responses follow the same format, they are plaintext and include a starting line (contain different info for requests/reponses), headers, and then an empty line and the content:
STARTING LINE HERE
HEADERS

CONTENT
The starting line for requests contains the Method, HTTP version and a slug. The starting line for a response includes the status code.
Headers
Headers are key-value pairs of data that can be passed on both requests and responses.
These can:
- Change the way data is processed
- Include additional data relevant to be processed
- Include additional data about the client/host to help with debugging and identification/authentication
So for example let’s say you’re sending a response and
MIME Types
A MIME type acts similarly to the way that extensions work on files. MIME types tell let the client/host know what type of content is being included in the request/response.
For example let’s say you’re sending a .css file across the network. You would include the header text/css to tell the browser to interpret the file as a CSS file that should be processed by the browser, if you changed the MIME type to text/plain then the browser will just show you the plain text of the CSS file. Essentially the extension is irrelevent most of the time, and the MIME type will take precidence over the extension. If no MIME type is provided some browsers will interpret everything as text, others will interpret them as a file to download, and others will try to just process certain files based on extension.
Request
Requests are used for a client to send a message to a host, typically this is the initialization of the HTTP communication, though some features of HTTP will require a HTTP Host to send requests to other servers to complete.
As mentioned earlier the starting line of an HTTP request includes the method and HTTP version. So for example these are all valid HTTP requests:
Basic GET
GET / HTTP/1.1
HOST: google.ca
With more headers and still no content
GET /about HTTP/1.1
Host: kieranwood.ca
Accept:text/html,application/xhtml+xml,application/xml;q=0.9,image/webp,image/apng,*/*;q=0.8,application/signed-exchange;v=b3;q=0.7
Accept-Encoding:gzip, deflate, br
Accept-Language:en-US,en;q=0.9
Cache-Control:max-age=0
Sec-Ch-Ua-Platform:"Windows"
User-Agent: Mozilla/5.0 (Windows NT 10.0; Win64; x64) AppleWebKit/537.36 (KHTML, like Gecko) Chrome/114.0.0.0 Safari/537.36 Edg/114.0.1823.58
With content and a POST request
POST /contact HTTP/1.1
Host: schulichignite.com
Content-Type: application/x-www-form-urlencoded
Content-Length: 27

[email protected]&name=Kieran
Methods
I talked about methods in the last section. There are several Methods with HTTP requests, these methods tell the server what you’re intending to do with your request:
| Method | Description | Example |
|---|---|---|
| GET | Used to get a resource | You request google.com to GET the webpage associated with that URL |
| POST | Used to send information to a server for creation | You POST the results of a form you filled out to a submission URL |
| PUT | Used to update existing information on a server (often POST is used in place of PUT for creation and updating) | You PUT an updated record of your favourite movies on a site that had an old list already on it |
| DELETE | You’re requesting the resource at the URL is deleted | You request to DELETE an image off your instagram account |
Responses
Responses are typically generated by the host as a response to a request, though sometimes the host will request some additional information from the client which will then send a response. HTTP responses are some of the hardest to parse because oficially the only thing they have to have is a status code, they don’t need headers or content to be considered “valid”.
As mentioned earlier the starting line of an HTTP request includes the status code. So for example these are all valid HTTP responses:
Response with no content or headers
200 OKResponse with no content, headers or status description
200Response with a status code and headers
200 OK
Host: schulichignite.com
Server: HHTTPP
Response with a status code, content and headers
200 OK
Host: schulichignite.com
Server: HHTTPP
Content-Type: text/html

<!DOCTYPE html>
<html lang="en">
<head>
    <meta charset="UTF-8">
    <meta http-equiv="X-UA-Compatible" content="IE=edge">
    <meta name="viewport" content="width=device-width, initial-scale=1.0">
    <title>Example Site</title>
</head>
<body>
    <h1>Hello World!</h1>

</body>
</html>
Status codes
Status codes are used to include information about how the processing of a request went. These are broken up into groups by the 100 up to 599. Each group’s starting number indicates what “type” of code it is. Additionally all official codes have a “description”, this is optional to be returned:
| Range | Description of group | Example |
|---|---|---|
| 100-199 | Informational responses; Gives you some early information before a response is fully ready | 102 Processing |
| 200-299 | Successful responses; The request had a successful result | 200 OK |
| 300-399 | Redirection Messages; The content you want is somewhere else, this response will tell you where to look | 301 Moved Permanently |
| 400-499 | Client Error Message; Something went wrong on the client end | 403 Forbidden |
| 500-599 | Server Error Responses; Something went wrong on the hosts end | 503 Service Unavailable |
People do create their own custom status codes (ahem), and also change the status descriptions often. It is not recommended to do this, if your custom code gets used for something down the road then your service will be broken!
Let’s look at existing sites
We can see how this works on real websites. Requests and responses are sent publicly so they can be inspected, and you can even manually construct requests.
Browser dev-tools
The easiest way to do this is right in your browser. If you are using a chromium based browser (Chrome, opera, edge etc. and also firefox has this functionality) you can use the developer tools to see the headers.
For me I need to open the developer tools and then head to the network tab.
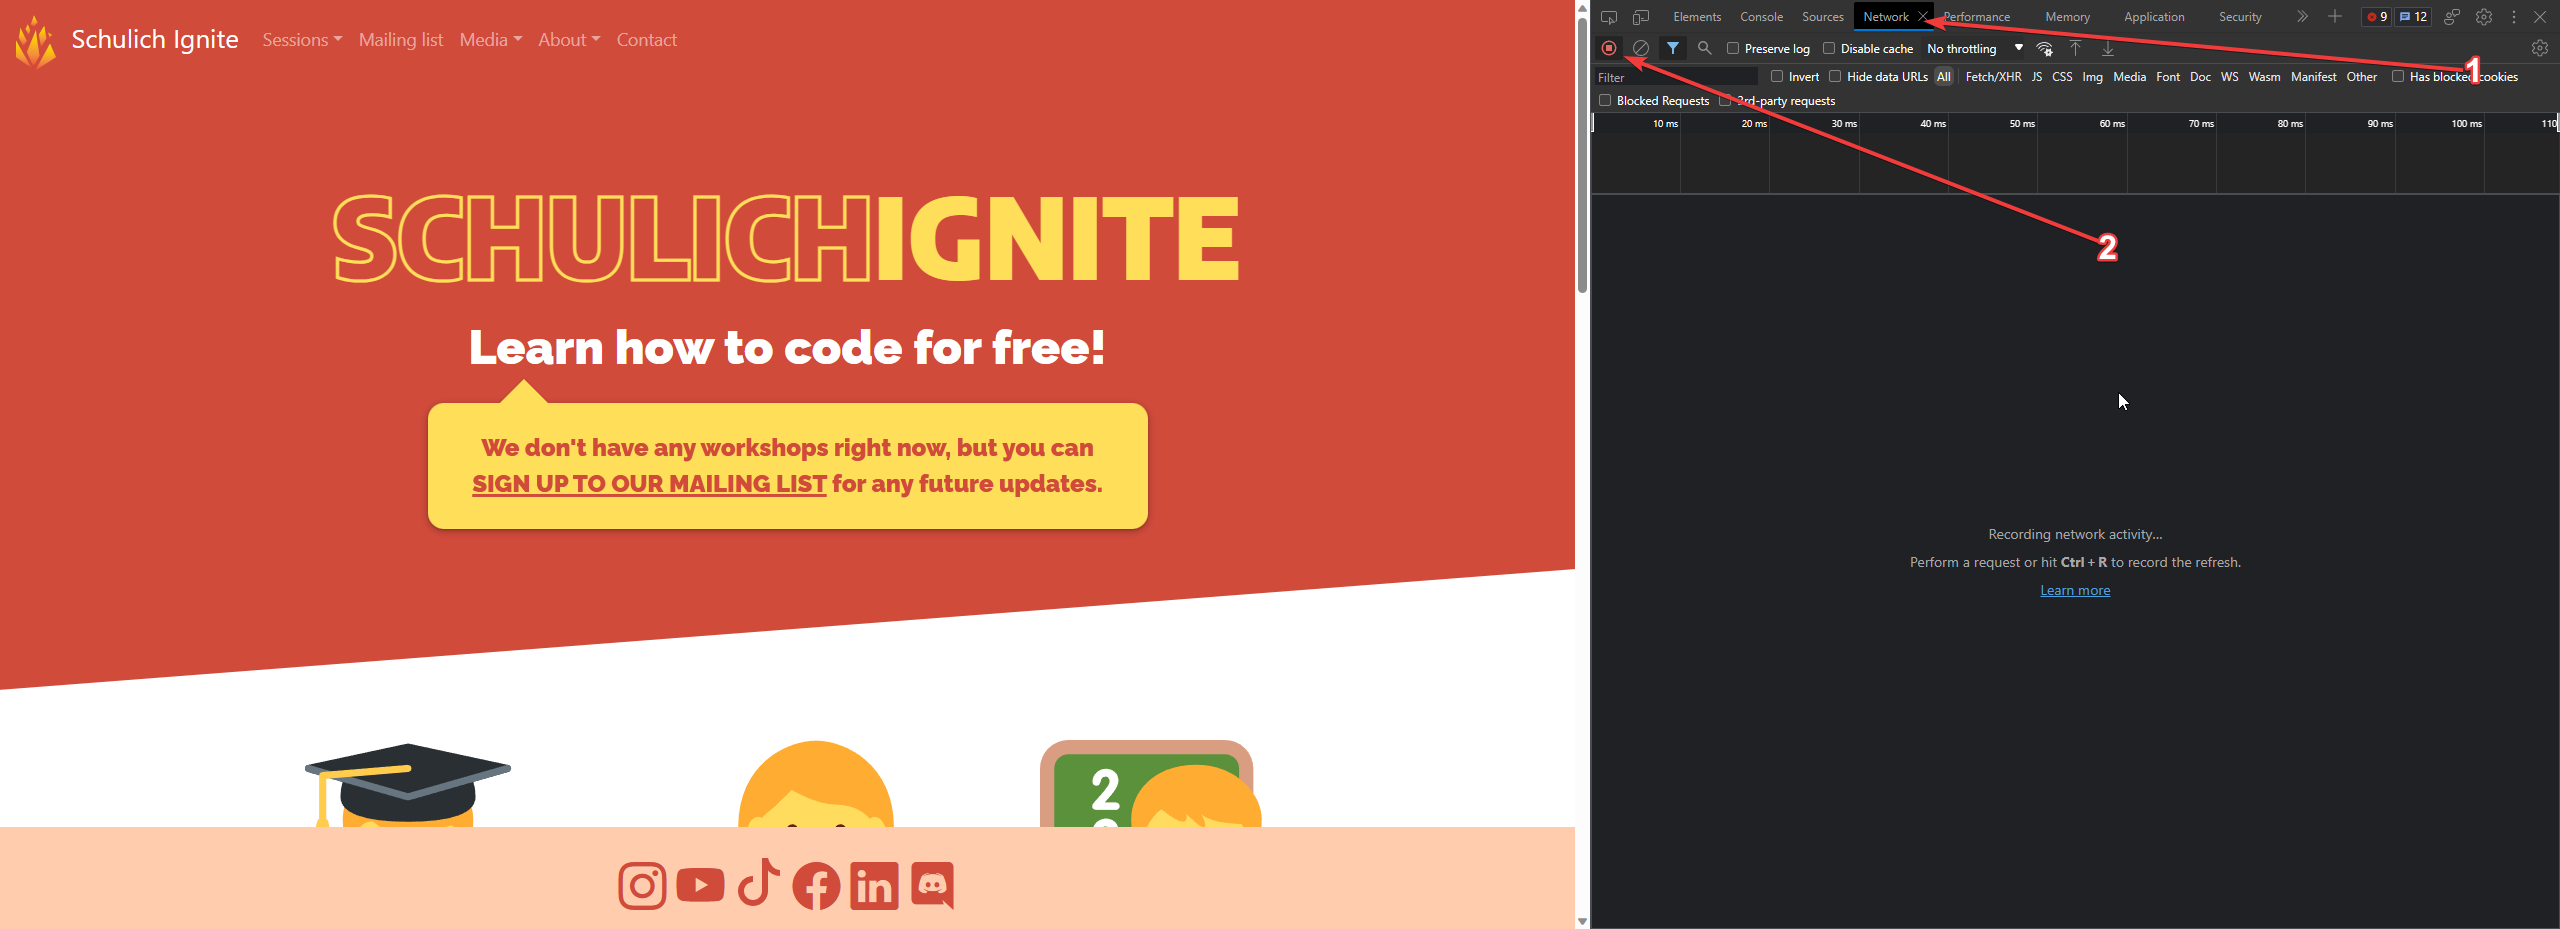
Now that I have it open I can go to https://schulichignite.com and will see the network requests come in. There are a bunch of requests and responses. The one we care about for now is one that has the type of document (this is the initial request response):

We can now inspect this request directly by double clicking on it:
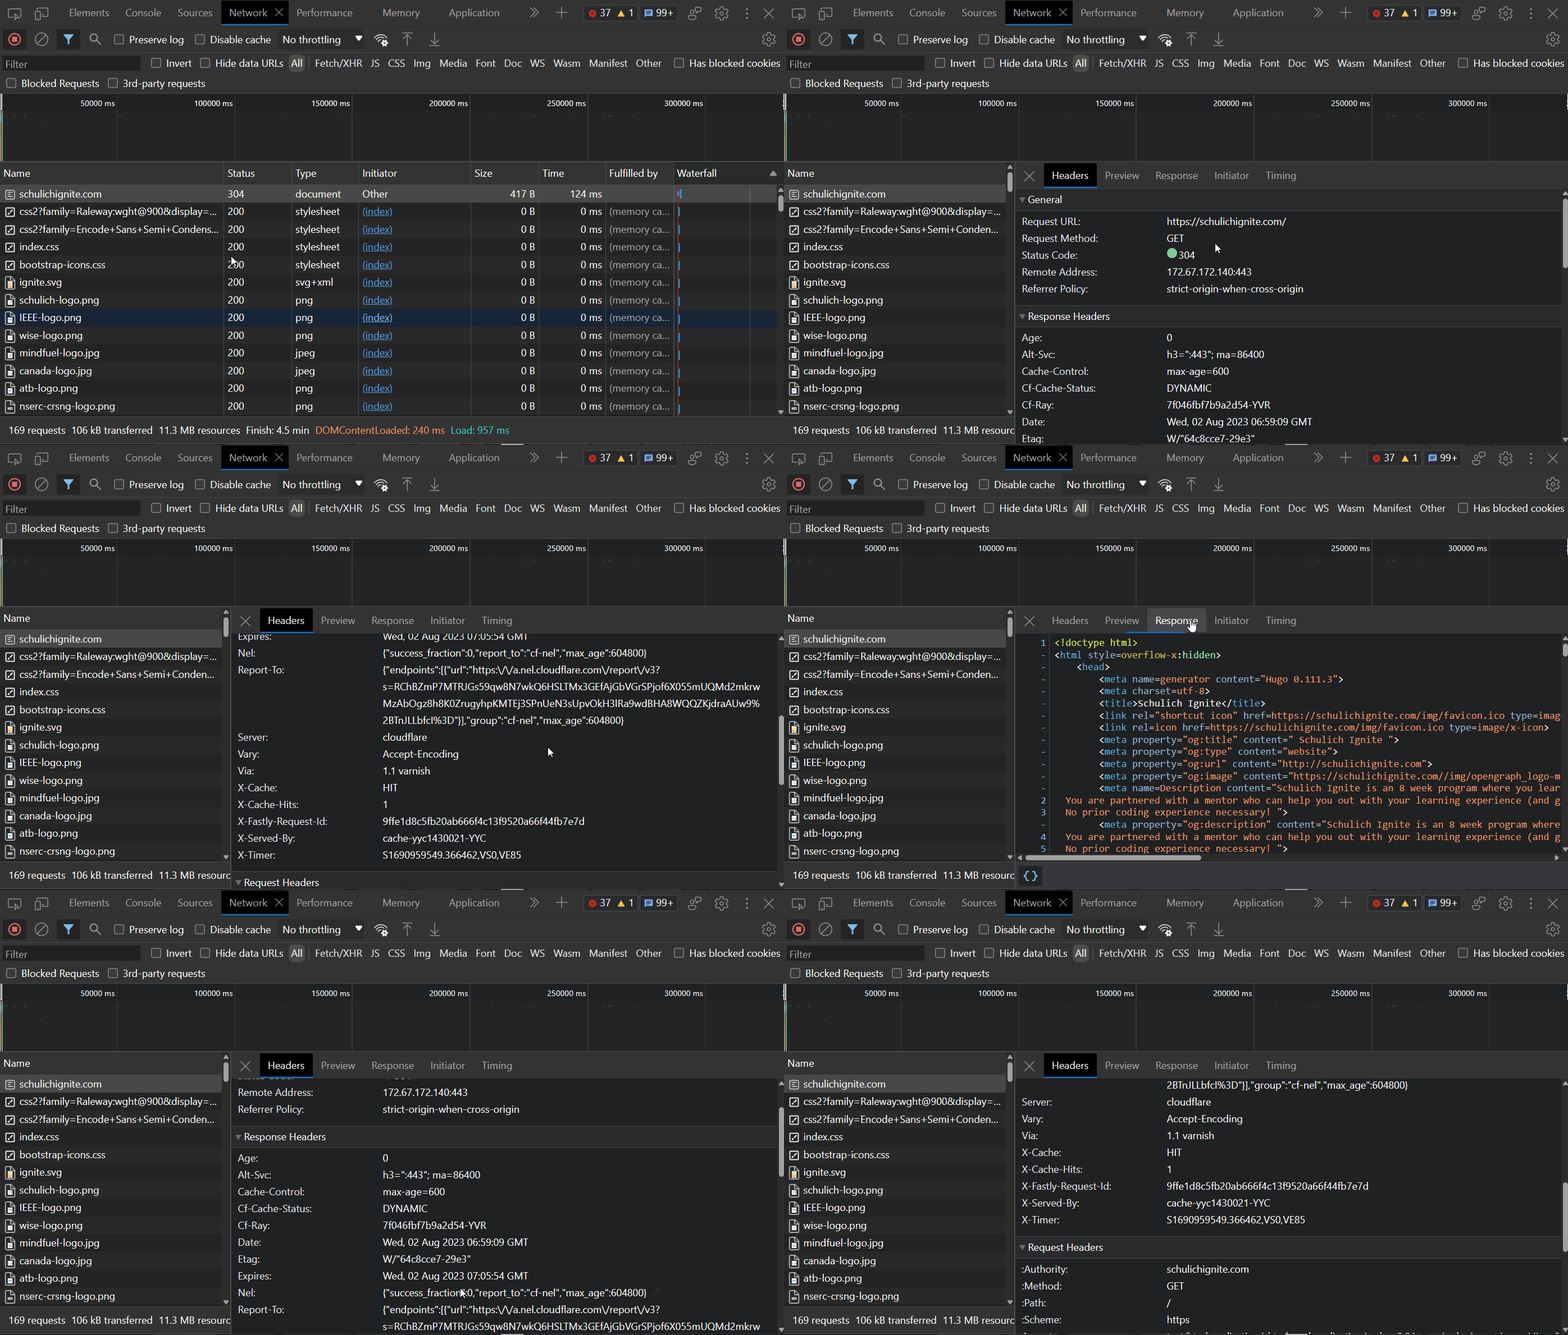
httpie
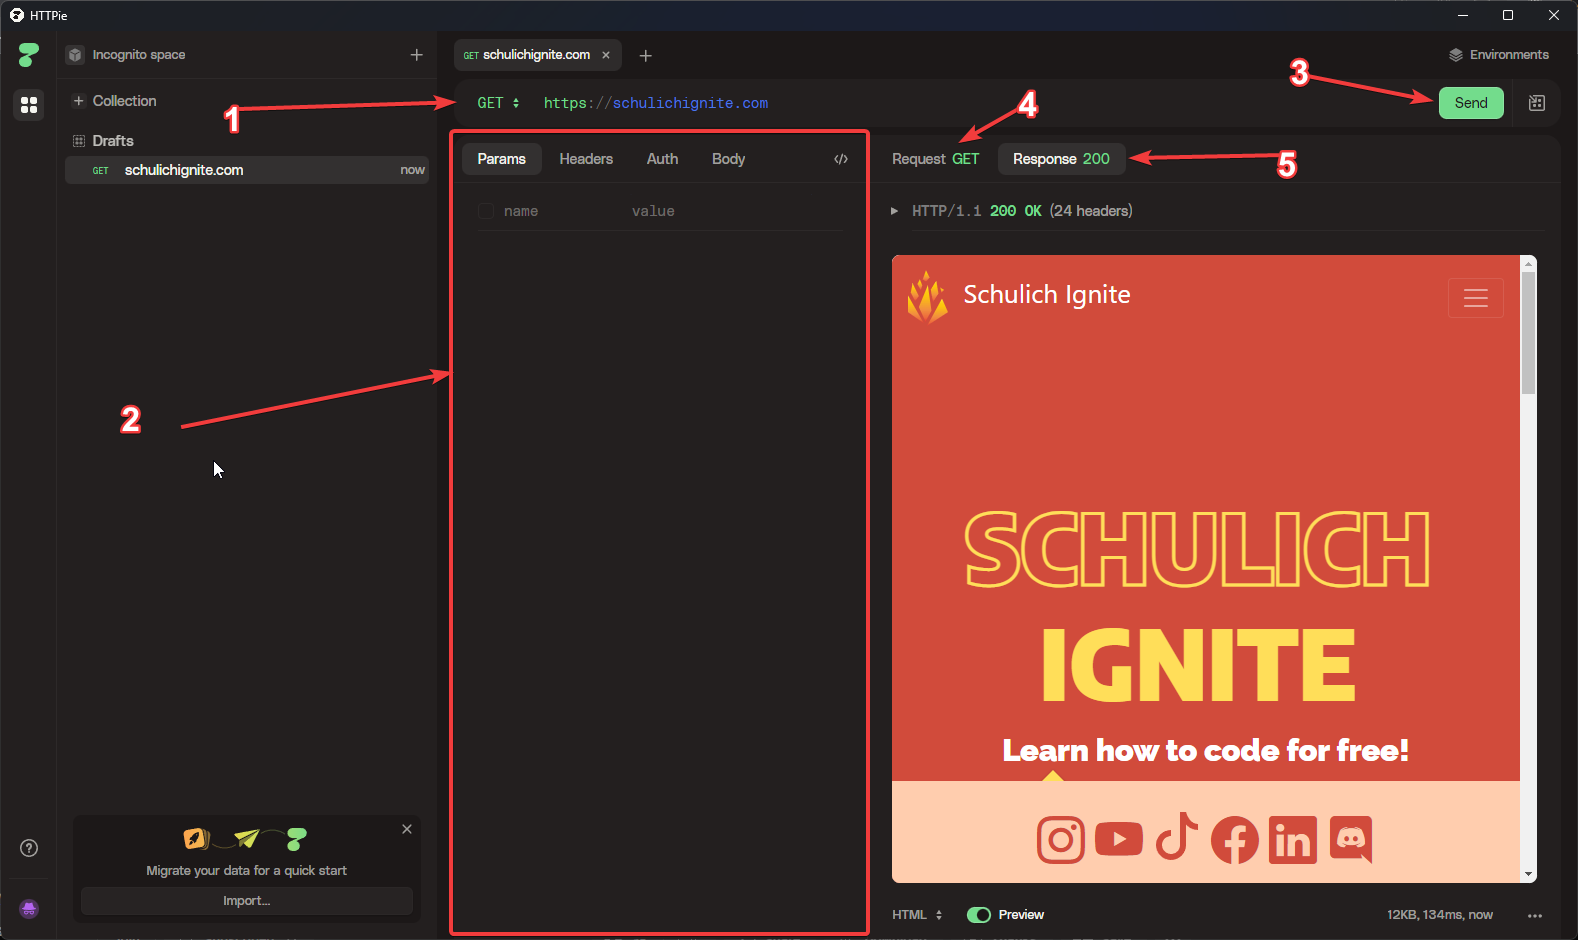
httpie is a GUI and CLI that will let you construct requests and see responses. Here is a diagram of how to use it:
- Select method and URL
- Modify headers and Body
- Send the request
- See the raw form of your request
- See your response
There is also a CLI version of httpie, but a much more robust CLI alternative is Curl
Curl
Curl is a common command line tool included in most linux distributions. This tool will allow you to do waaay more than just create requests and see responses, and it’s worth looking into yourself. But for the absolute basics if you want to send a simple GET request you can do it with:
curl https://schulichignite.comYou can then add headers by adding a -H flag with the text:
curl https://schulichignite.com -H "Host: schulichignite.com"You can then change the method using -X:
curl -X DELETE https://schulichignite.com/image/my-image.pngHow we’re going to implement all this
As mentioned earlier our process will be to create 3 classes whichwill represent all of our required HTTP interaction, these will be added to in later posts to add additional functionality. Here are the required features for the 3 classes:
Servers must be able to:
- Parse a request into a
Requestobject - Process
Requestobjects and generateResponse(s) - Parse
Responseobjects into plaintext/binary responses - Parse
Requests to genera into plaintext/binary requests to send to other servers (we won’t use this, but it’s handy)
Requests must have:
- A method (
GET,PUT,POST,DELETE) - A hostname
- A slug
- Additional Headers (optional)
- Content (optional)
Responses must have:
- A status code
- Headers (optional)
- Content (optional)
On top of these there are a few “helper” objects that will be stored inside these objects:
StatusCode
- Used to store status codes and their corresponding descriptions with some data validation
MIMEType
- A class used to store the MIME type and path to the resource
- Has a function that takes the path to a resource and generates a valid MIMEType for that file
Testing
Now that we’ve know the features we need to go through and write tests so we know they work properly and then write the features to make the tests work. We’re going to do this using pytest. This is a testing framework that will help us check if our code is working correctly. Specifically we are going to write tests for how we want the system to work, and then edit the code until the tests pass.
This is called test driven development (TDD), and it’s a common practice in software development. This doesn’t work well for every type of application, but it’s handy for protocols where there are clear rules that the system should abide by. Since we know what should happen we know what tests to write, usually the biggest problem of TDD is we don’t know exactly what functionality we need, which makes writing tests hard. Since we know the protocol well enough we know what it should do and so the tests can accurately tells us if we make a mistake in our code.
The tests can all be found inside the /tests folder for each post.
To get started run:
pip install -e .; Should be run in the main directory (wheresetup.pyis). This installshhttppas an editable package, meaning changes to the folder are automatically updated without needing to be reinstalledpytest; Once you have the project installed you can run the command in the main directory (wheresetup.pyis) to run the tests
From there within the source code our structure is basically to have 1 long test function per class, which tests that classes functionality.
Our TDD Approach
We are going to create these objects by first defining some tests that say how we want users to use our code when it’s done. For example we can write some tests to make sure we can create status codes, that it works at all edge cases, and that is errors if we go out of the range of allowed status codes (100-599):
/tests/classes_test.py
from pytest import raises
from hhttpp.classes import *

def test_status_codes():
    # Correct cases
    StatusCode(101,"Switching Protocols")
    StatusCode(200, "Ok")
    StatusCode(301, "Moved Permenantly")
    StatusCode(404, "Not Found")
    StatusCode(500, "Internal Server Error")

    # Edge cases
    StatusCode(100, "Continue")
    StatusCode(599, "")

    # Error case
    with raises(ValueError):
        StatusCode(-1, "Broken")
    with raises(ValueError):
        StatusCode(99, "Switcheroonied")
    with raises(ValueError):
        StatusCode(600, "Uknown Browser")
So we can create these sorts of tests for each of these classes. So for example if we wanted to have a method on the Server object called Server.parse_request(request:str)->Request, we can pre-create a test and put it in the file that will fail until we create the correct method:
/hhttpp/classes.py
@dataclass
class Server:
    ... # More attributes and methods here removed for simplicity

    def parse_request(request:str)->Request:
        ...
/tests/classes_test.py
from pytest import raises
from hhttpp.classes import *

def test_server():
    s = Server()

    raw_request = "GET / HTTP/2\nHost: schulichignite.com"

    req = s.parse_request(raw_request)

    assert type(req) == Request # Will fail until a request object is returned
From here then when we eventually fill out the function (in this case we’re going to hardcode a result and we’ll do the parsing in the next post):
/hhttpp/classes.py
@dataclass
class Server:
    ... # More attributes and methods here removed for simplicity

    def parse_request(request:str) -> Request:
        # TODO: Parse input text to generate Request object
        result = Request("schulichignite.com", "/", "GET")
        if len(self.logs) >= self.log_limit:
            print("500 or more, popping value")
            self.logs.pop()
        self.logs.append(result)
        return result
This approach of creating tests that expect the correct result, and then making our project around these tests is how I will build out the rest of this system.
HHTTPP Structure
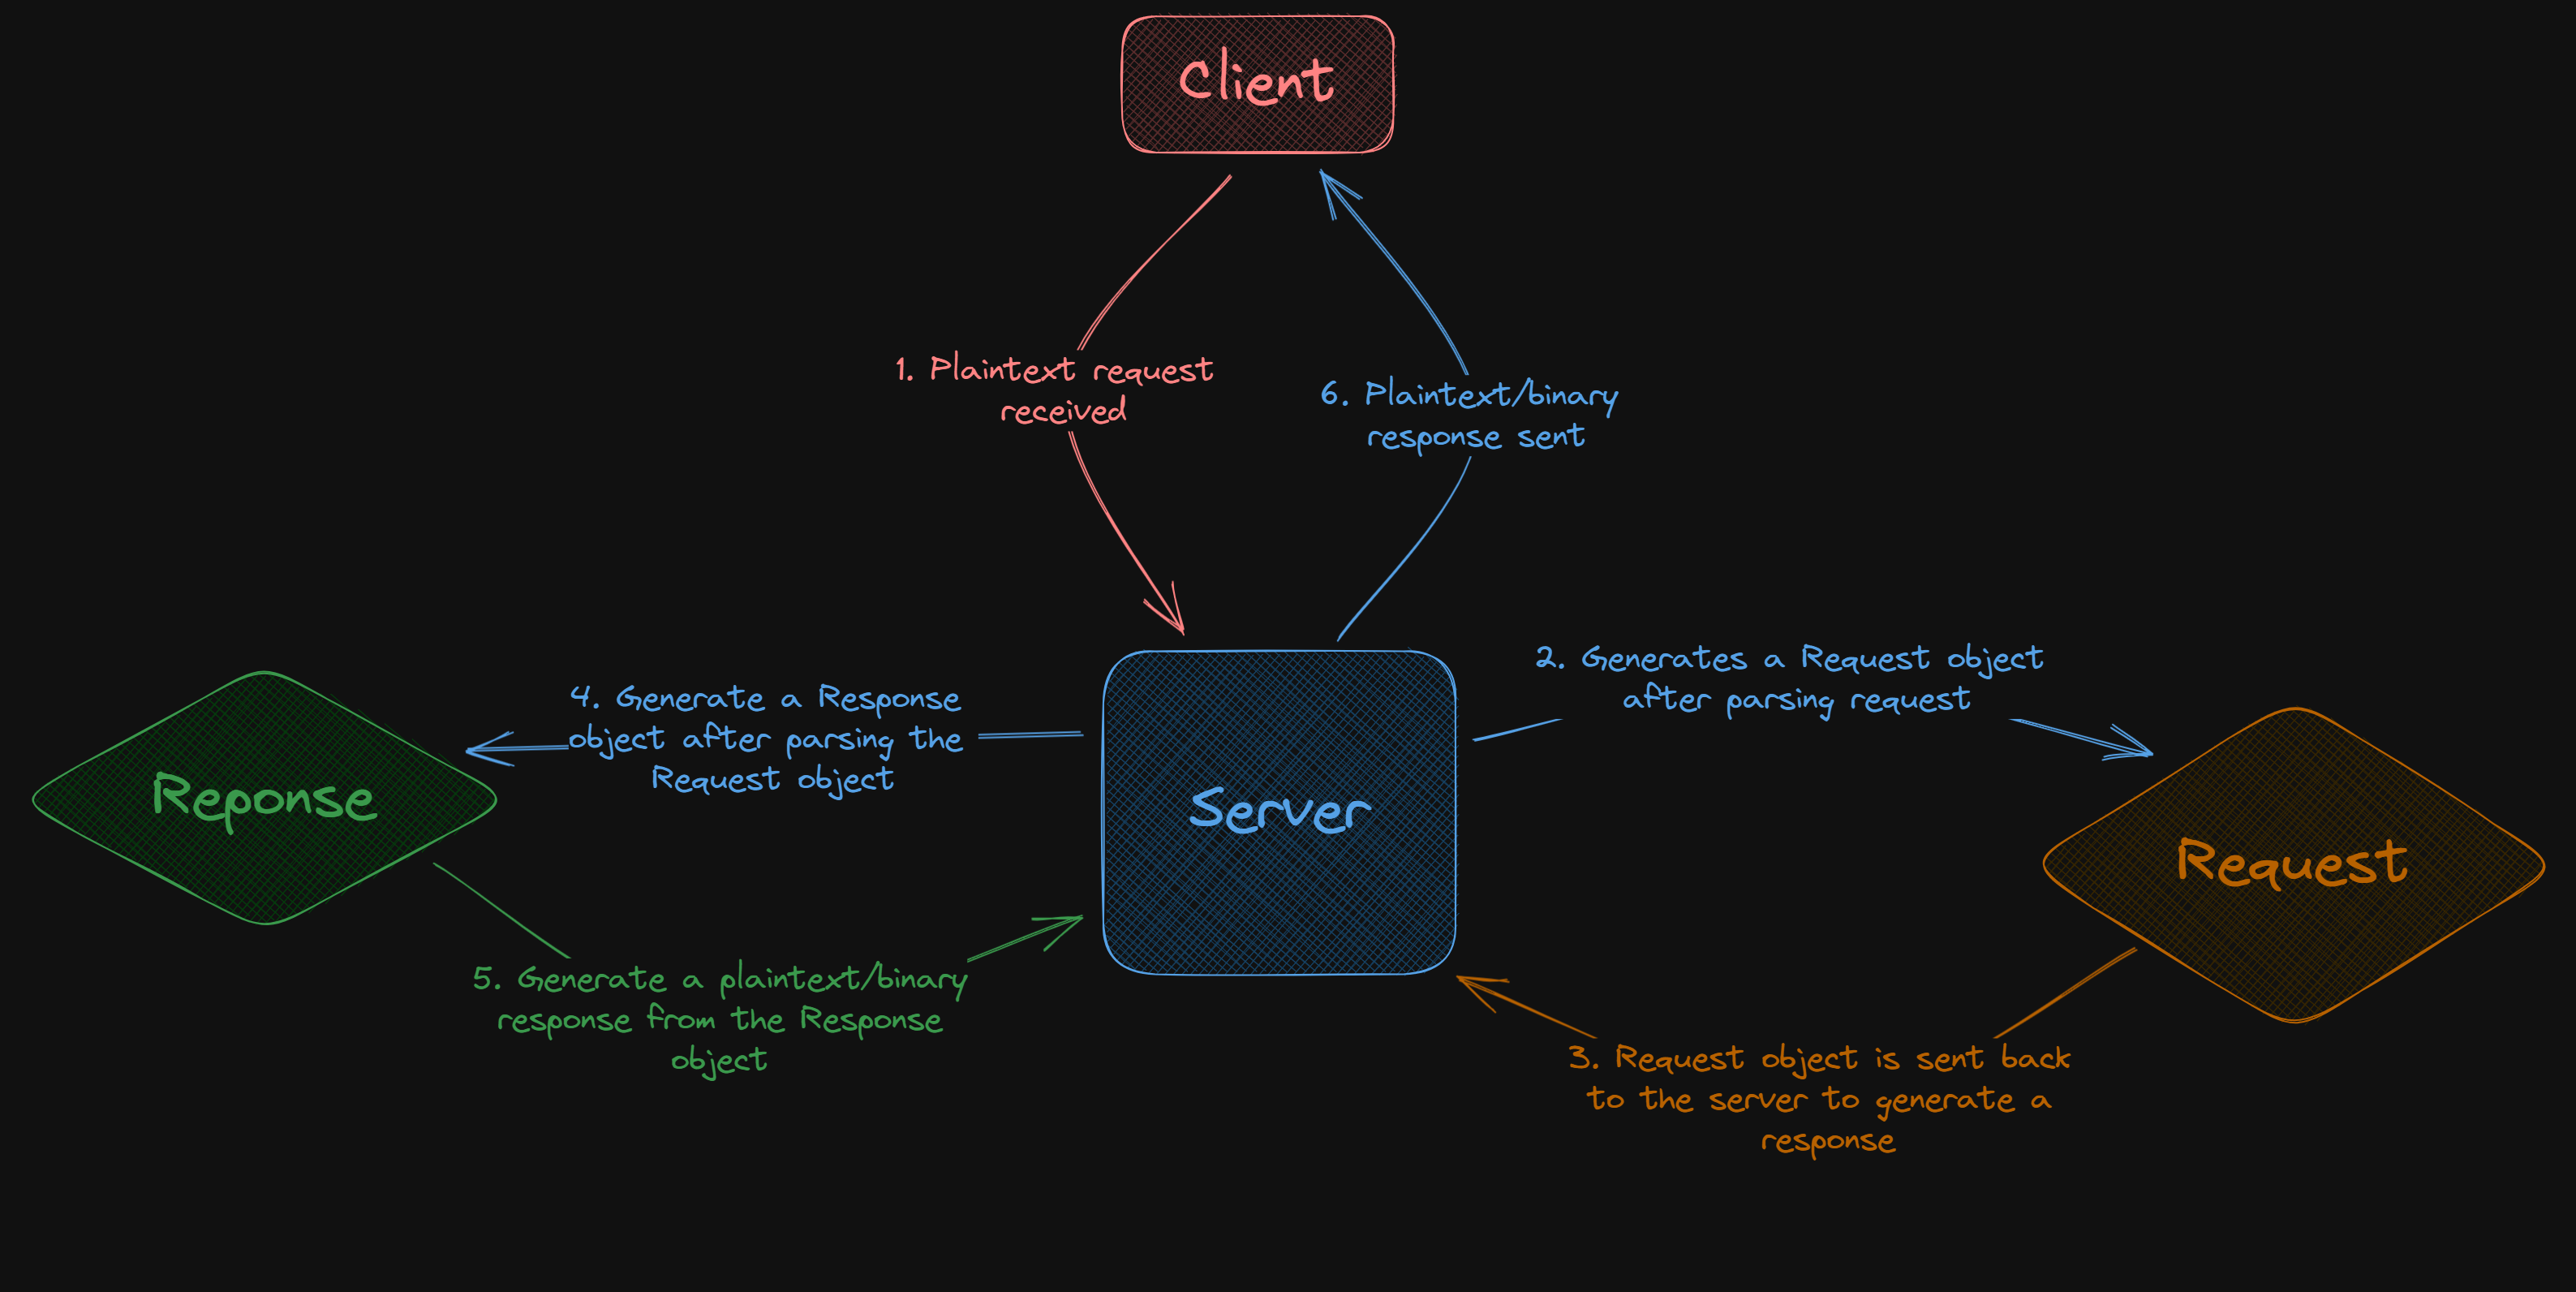
Essentially code wise we will have a single Server object. This server object will process incoming requests into Request objects, parse them, then generate a Response object and send back the correctly formatted response:
Additional features
Some of the objects have additional features beyond the required HTTP features
Server
- Error on 4xx/5xx optional
- Logs (storing requests and responses sent/recieved)
- Ability to specify which directory to proxy
Response
- is_binary flag for responses that contain binary content (i.e. images, pdf’s, exe’s etc.)
- A server header that defaults to
HHTTPP is_errorflag for responses that are errors (4xx/5xx)